KeycloakとOIDCを用いたSpringアプリケーションの実装
SpringアプリケーションでのOIDCを利用したシングルサインオン実装方法を説明する。
目次
1.OIDCとは
2.Keycloakの設定
3.OIDC認可のためのライブラリをインストール
4.OIDC認証実装
5.OIDC認証実装②
1.OIDCとは
OIDC(OpenID Connect)は、シングルサインオン(SSO)を実現する際に使用されるプロトコルの一つ。
このプロトコルは、異なるアプリケーション間での認証情報の共有を可能にし、そのためにIDトークンと呼ばれるJSON形式のトークンを使用する。
ウェブアプリケーション、モバイルアプリ、API、IoTデバイスなど、さまざまなアプリケーションで利用されており、モダンなアイデンティティとアクセス管理の標準として広く採用されている。
【参考】
◎ OIDCとSAML
◎ OAuthとOpenID Connectについて
●OIDC認証フロー

2.Keycloakの設定
ユーザーロールの割り当てまでは『KeycloakとSAMLを用いたSpringアプリケーションの実装』を参照すること。
2-1.クライアントを作成する
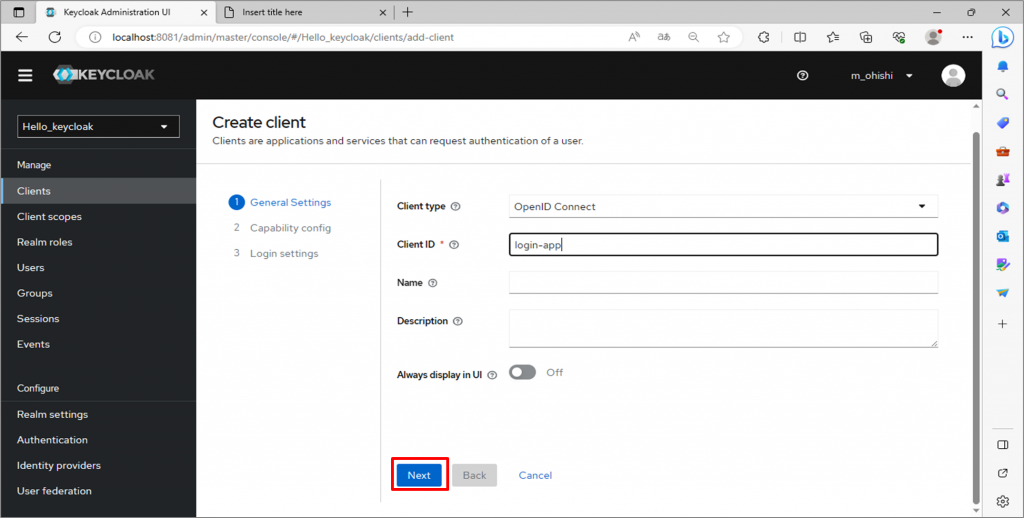
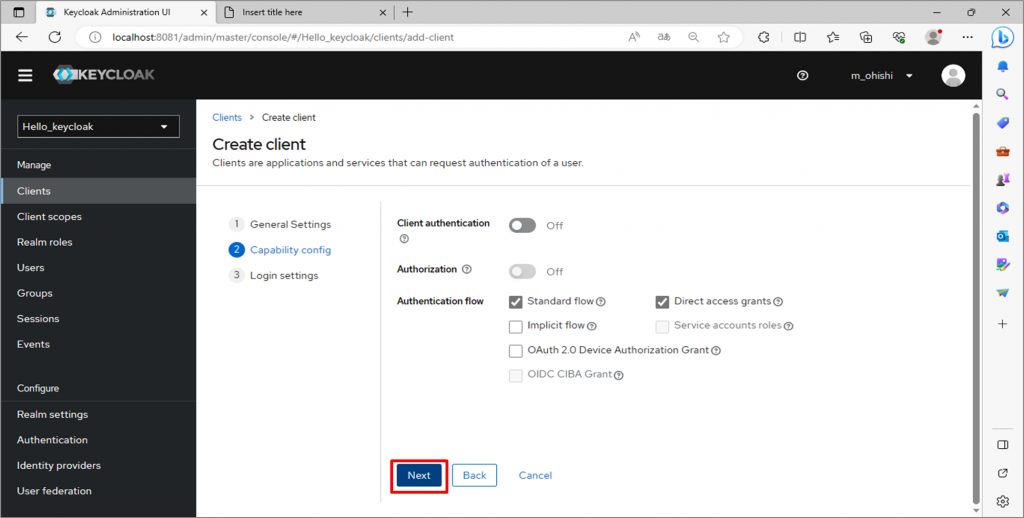
作成したレルムのClientsタブに遷移し、Create client をクリックする。

Client type:OpenID Connectを指定
Client ID :任意の値を設定
Next をクリック
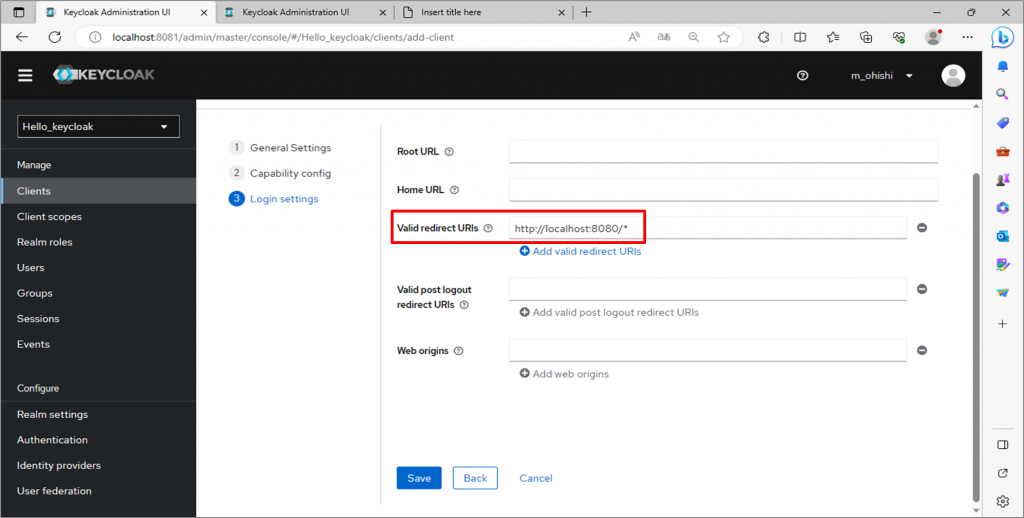
デフォルトのまま Nextをクリック
Valid redirect URIs にSpring Application のホストにワイルドカードを指定して保存
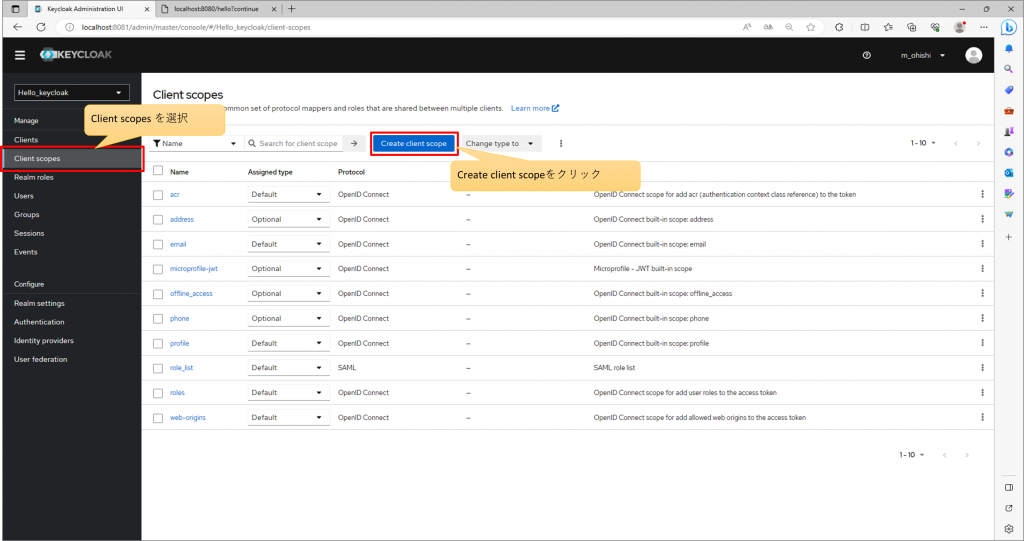
2-2.権限制御のためのスコープを作成する
※email, profileといったスコープがデフォルトで用意されているため、それらを使用する場合はこの手順は省略可能
作成したレルムのClient scopesタブに遷移し、Create client scope をクリック
適当な名称を入力して保存
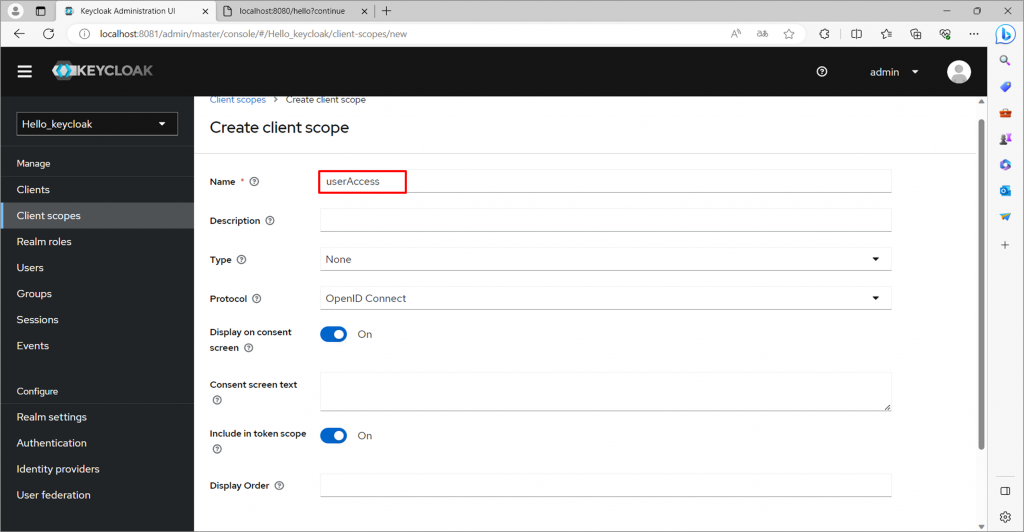
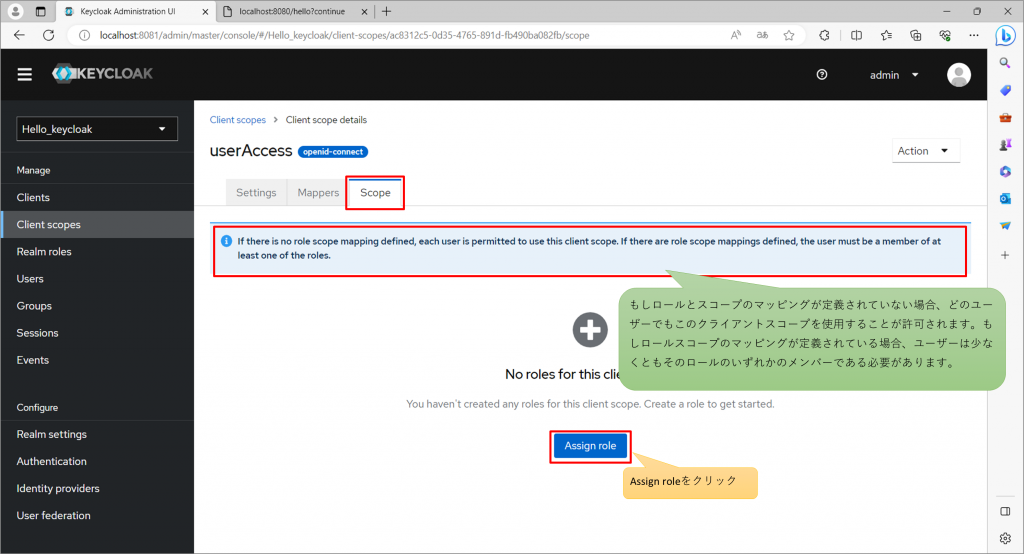
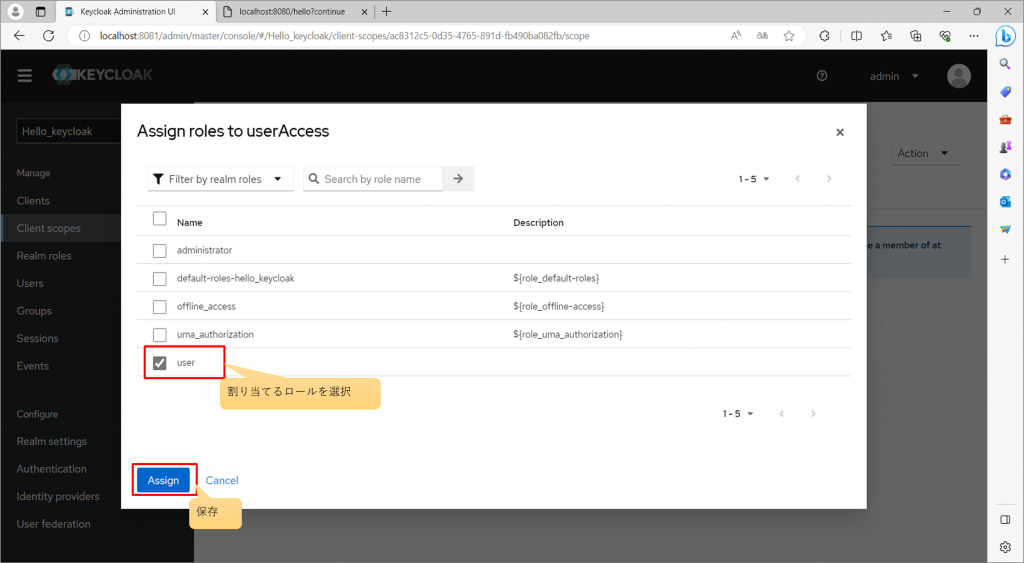
Scopeタブを開き、ロールを割り当てる。
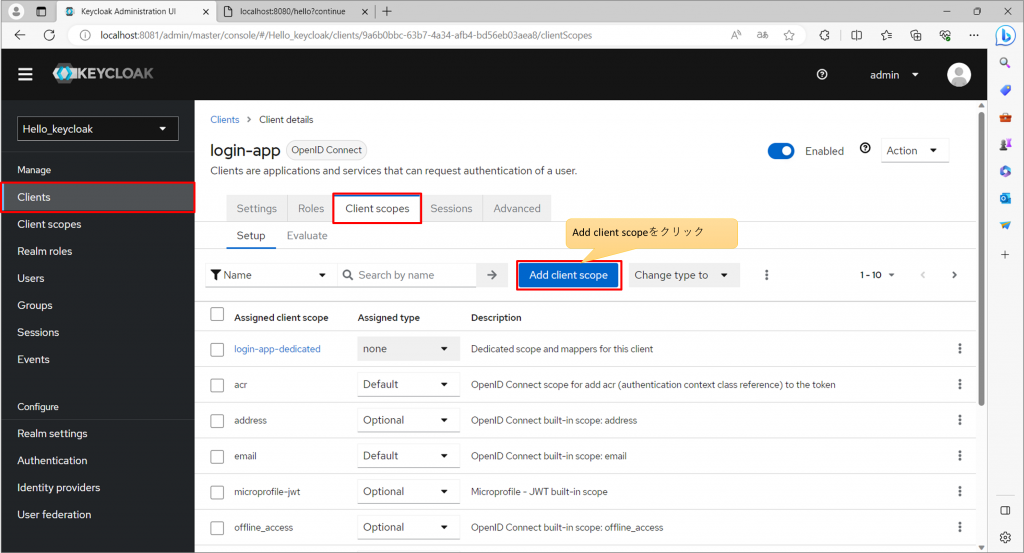
先ほど作成したクライアントの画面へ移動し、Client scopesタブを開く。
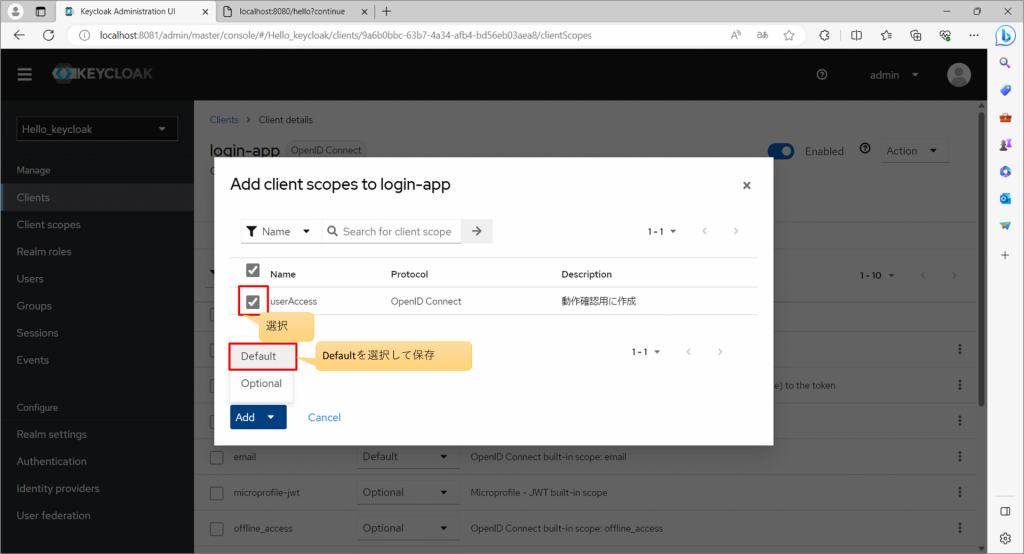
先ほど作成したスコープを追加する。
3.OIDC認可のためのライブラリをインストール
3-1.pom.xmlの「<dependencies></dependencies>」内に下記ライブラリ3つ追記する
	:
	<dependencies>
		:
		<!-- ここから -->
		<!-- Spring Security -->
		<dependency>
			<groupId>org.springframework.boot</groupId>
			<artifactId>spring-boot-starter-security</artifactId>
		</dependency>

		<!-- OIDC導入 -->
		<dependency>
			<groupId>org.springframework.boot</groupId>
			<artifactId>spring-boot-starter-oauth2-client</artifactId>
		</dependency>
		<dependency>
			<groupId>org.springframework.boot</groupId>
			<artifactId>spring-boot-starter-oauth2-resource-server</artifactId>
		</dependency>
		<!-- ここまで -->
		:
	</dependencies>
3-2.ライブラリをインストールする
①プロジェクトを右クリック>[実行]>[Maven clean]
②プロジェクトを右クリック>[Maven]>[プロジェクトの更新]
③プロジェクトを右クリック>[実行]>[Maven install]
4.OIDC認証実装
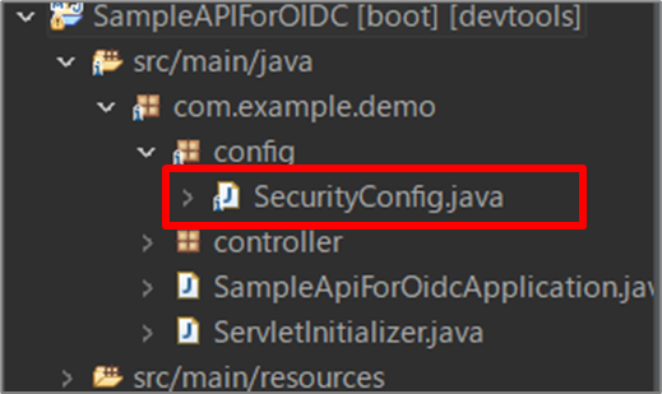
4-1.SpringSecurityの認証・認可設定ファイル作成
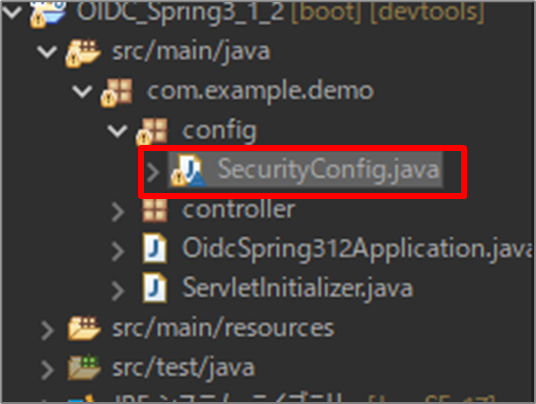
package com.example.demo.config;

import java.util.HashSet;
import java.util.Map;
import java.util.Set;

import org.springframework.context.annotation.Bean;
import org.springframework.context.annotation.Configuration;
import org.springframework.security.config.Customizer;
import org.springframework.security.config.annotation.web.builders.HttpSecurity;
import org.springframework.security.config.annotation.web.configuration.EnableWebSecurity;
import org.springframework.security.core.GrantedAuthority;
import org.springframework.security.core.authority.SimpleGrantedAuthority;
import org.springframework.security.oauth2.client.oidc.userinfo.OidcUserRequest;
import org.springframework.security.oauth2.client.oidc.userinfo.OidcUserService;
import org.springframework.security.oauth2.client.userinfo.OAuth2UserService;
import org.springframework.security.oauth2.core.oidc.user.DefaultOidcUser;
import org.springframework.security.oauth2.core.oidc.user.OidcUser;
import org.springframework.security.web.SecurityFilterChain;
import org.springframework.security.web.servlet.util.matcher.MvcRequestMatcher;
import org.springframework.web.servlet.handler.HandlerMappingIntrospector;

import com.nimbusds.jose.shaded.gson.internal.LinkedTreeMap;

import net.minidev.json.JSONArray;
import net.minidev.json.JSONObject;
import net.minidev.json.JSONValue;

@Configuration
@EnableWebSecurity
class SecurityConfig {
    @Bean
    public SecurityFilterChain filterChain(HttpSecurity http, HandlerMappingIntrospector introspector) throws Exception {
    	MvcRequestMatcher.Builder mvcMatcherBuilder = new MvcRequestMatcher.Builder(introspector);

    	http
		.authorizeHttpRequests(authz -> authz
			// URLごとの認可設定
			// 認証したユーザのみがアクセス可能な画面として、"/hello"を用意しておく
			.requestMatchers(mvcMatcherBuilder.pattern("/hello*")).hasAuthority("SCOPE_userAccess")
			.anyRequest().permitAll()
		).oauth2Login(oauth -> oauth
			Customizer.withDefaults()
			)
		);

		return http.build();
    }
}| .requestMatchers() | .hasAuthority(“ROLE_USER”):ロール「user」を持つユーザのみアクセス可能。 .authenticated():認証済みのユーザであれば誰でもアクセス可能。 |
| .oauth2Login(oauth -> oauth Customizer.withDefaults()) | OIDC認証を行うよう設定する。 |
4-2.application.propertiesに各種設定を記載する
# login-app ⇒ keycloakに設定したClientID
spring.security.oauth2.client.registration.keycloak.client-id=login-app
spring.security.oauth2.client.registration.keycloak.authorization-grant-type=authorization_code
spring.security.oauth2.client.registration.keycloak.scope=openid

# http://localhost:8081/realms/Hello_keycloak ⇒ [keycloakのホスト]/realms/[レルム名]
spring.security.oauth2.client.provider.keycloak.issuer-uri=http://localhost:8081/realms/Hello_keycloak
spring.security.oauth2.client.provider.keycloak.user-name-attribute=preferred_username

# http://localhost:8081/realms/Hello_keycloak ⇒ [keycloakのホスト]/realms/[レルム名]
spring.security.oauth2.resourceserver.jwt.issuer-uri=http://localhost:8081/realms/Hello_keycloak
4-3.動作確認
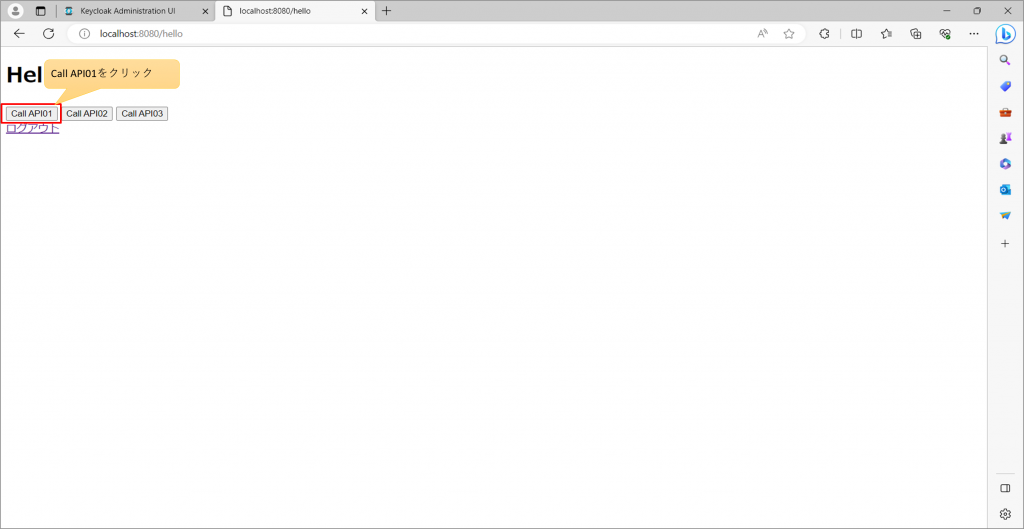
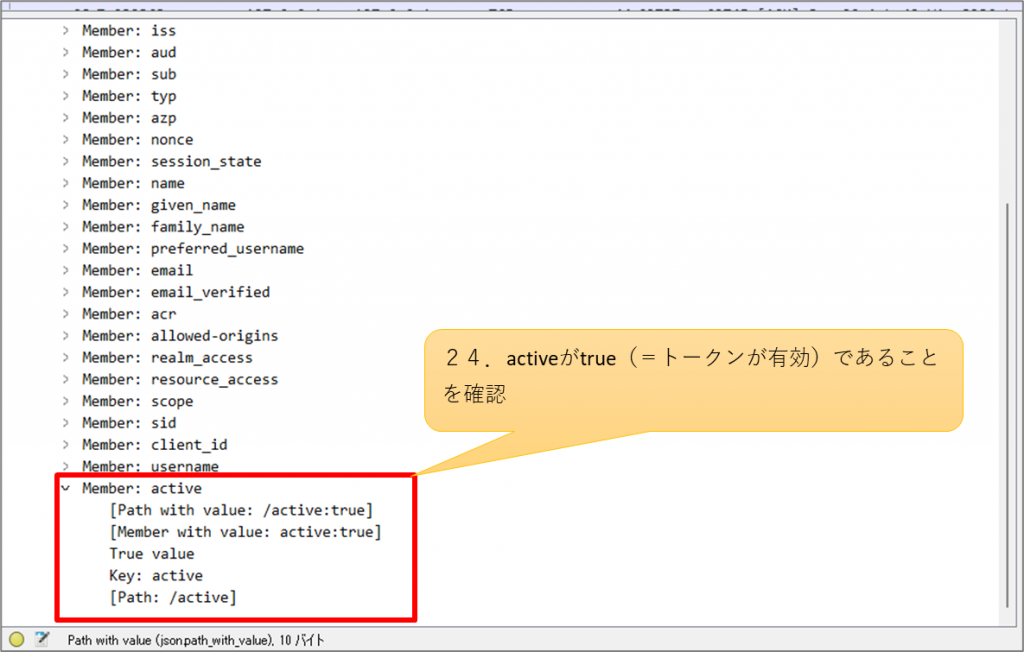
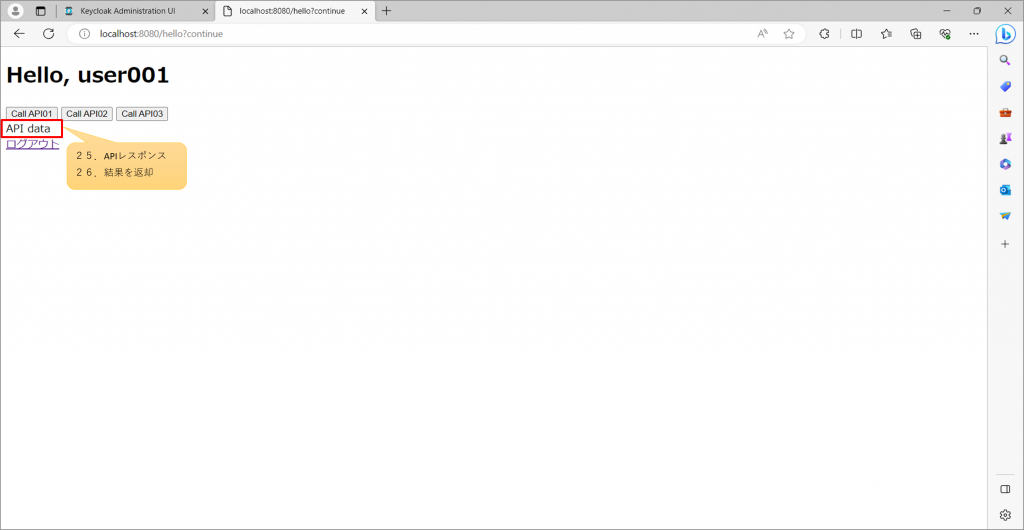
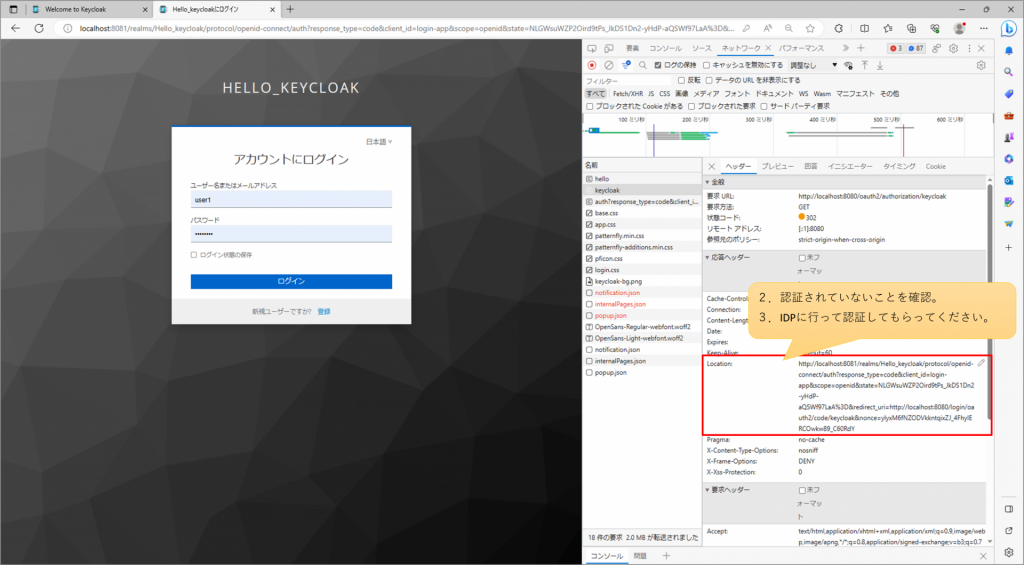
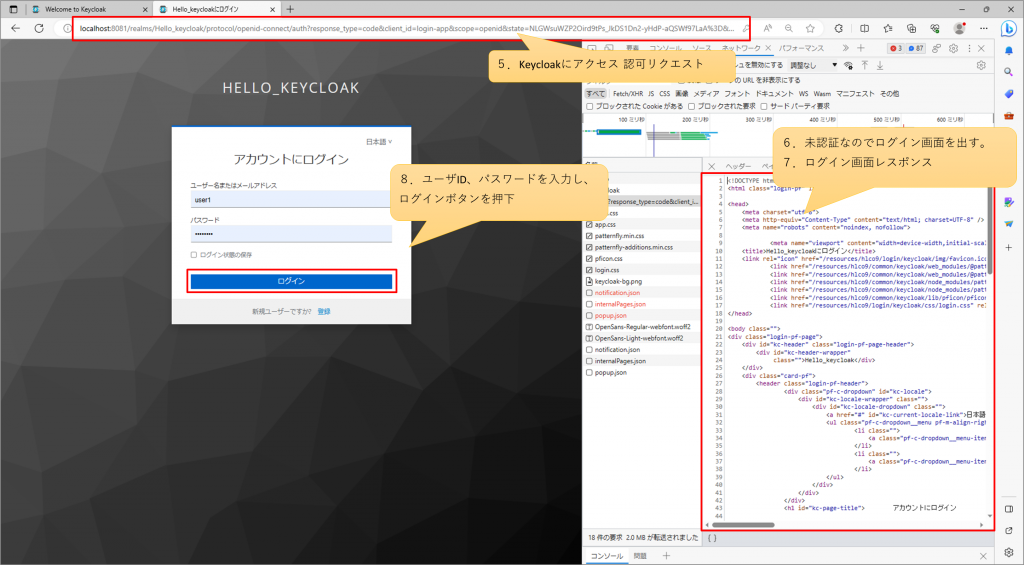
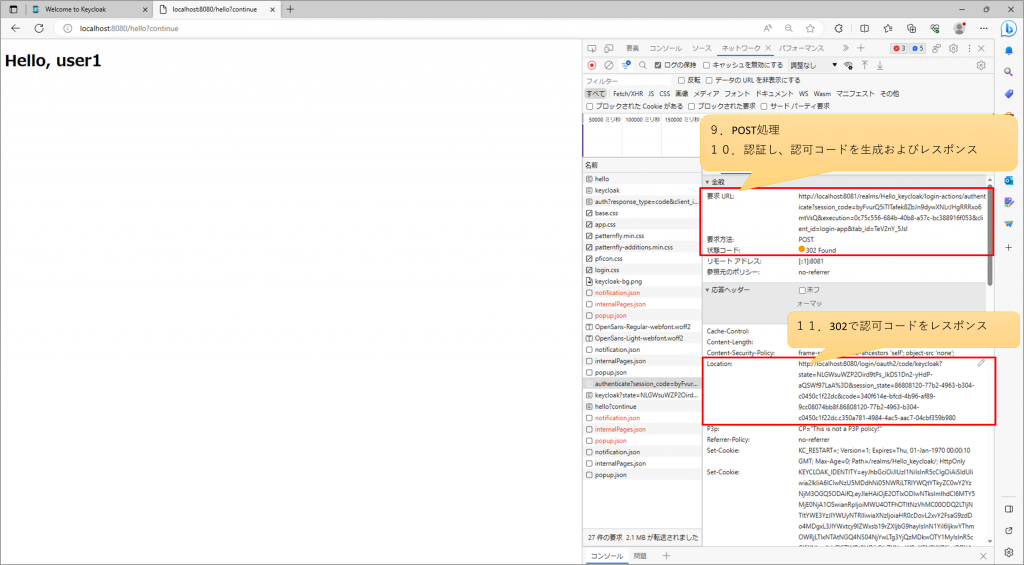
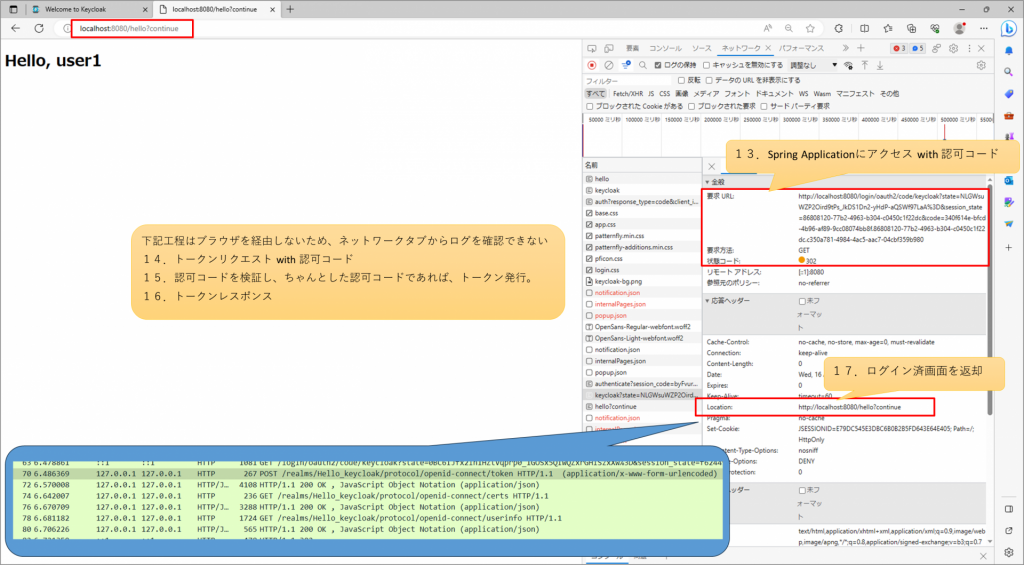
※下記の番号はすべて「●OIDC認証フロー」に対応している。
Spring Applicationにアクセス
http://localhost:8080/hello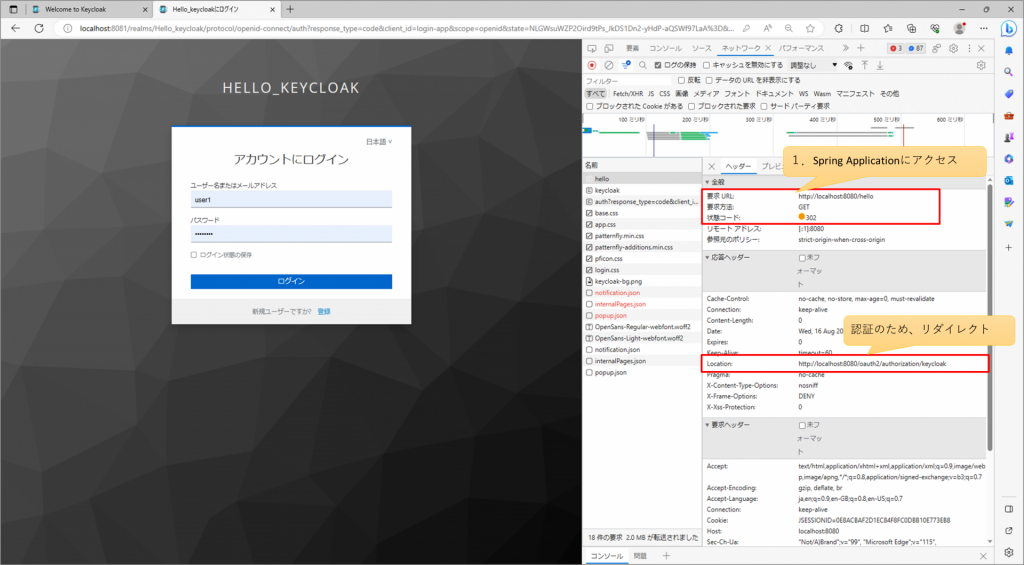
5.OIDC認証実装②
OIDC認証でログイン後、アクセストークンを渡してAPIを呼び出せるようにする。
5-1.Keycloak設定
APIアプリケーション用に新規クライアントを作成する。
任意のClient IDを設定し、Client AuthenticationをONにすること。
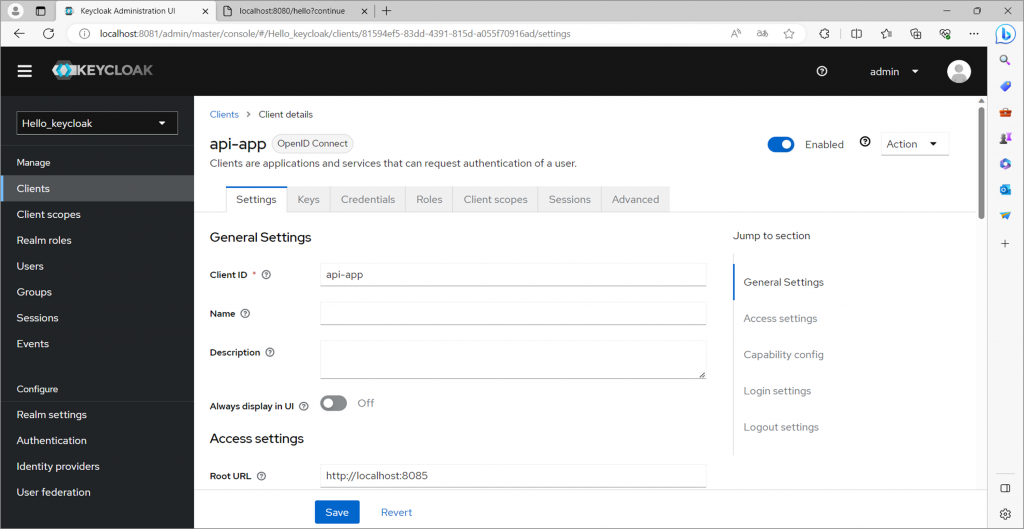

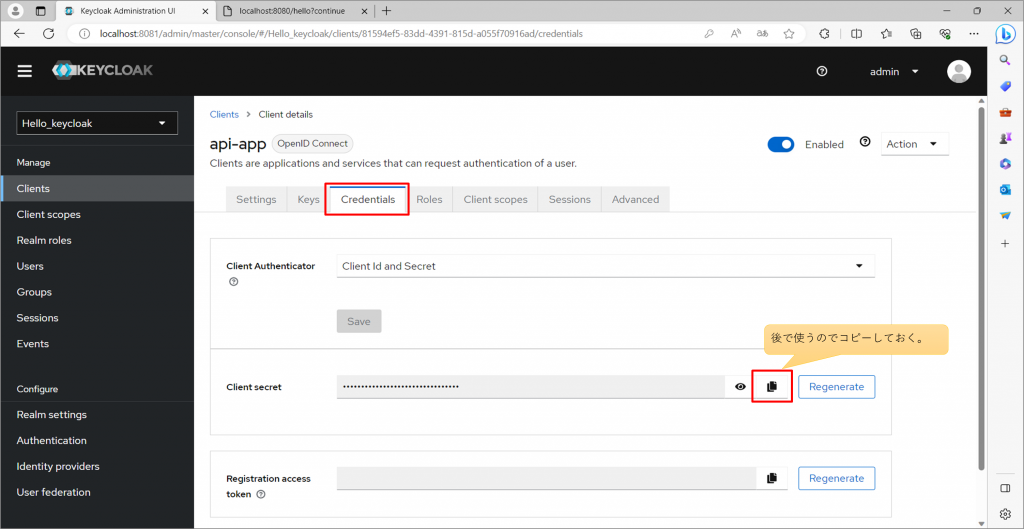
Client AuthenticationをONにすることで、Credentialsタブが現れる。
後ほど、設定ファイルへの記載が必要となるので『Client secret』の値をコピーしておく。
5-2.SpringSecurityの認証・認可設定ファイル作成
package com.example.demo.config;

import org.springframework.context.annotation.Bean;
import org.springframework.context.annotation.Configuration;
import org.springframework.security.config.Customizer;
import org.springframework.security.config.annotation.web.builders.HttpSecurity;
import org.springframework.security.config.annotation.web.configuration.EnableWebSecurity;
import org.springframework.security.web.SecurityFilterChain;
import org.springframework.security.web.servlet.util.matcher.MvcRequestMatcher;
import org.springframework.web.cors.CorsConfiguration;
import org.springframework.web.cors.CorsConfigurationSource;
import org.springframework.web.cors.UrlBasedCorsConfigurationSource;
import org.springframework.web.servlet.handler.HandlerMappingIntrospector;

@Configuration
@EnableWebSecurity
public class SecurityConfig {
    @Bean
    public SecurityFilterChain filterChain(HttpSecurity http, HandlerMappingIntrospector introspector) throws Exception {
    	MvcRequestMatcher.Builder mvcMatcherBuilder = new MvcRequestMatcher.Builder(introspector);

    	http
		.authorizeHttpRequests(authz -> authz
			// URLごとの認可設定
			// "/data"と"/data2"画面をそれぞれ用意しておく
			.requestMatchers(mvcMatcherBuilder.pattern("/data")).hasAuthority("SCOPE_userAccess")
			.requestMatchers(mvcMatcherBuilder.pattern("/data2")).authenticated()
			.anyRequest().permitAll()
		).oauth2ResourceServer(oauth -> oauth
			.opaqueToken(Customizer.withDefaults())
		);

		return http.build();
    }
}| .oauth2ResourceServer(oauth -> oauth .opaqueToken(Customizer.withDefaults()) | トークンイントロスペクションを行うための設定 |
5-3.application.propertiesに各種設定を記載する
# 呼び出し側と同時起動が必要なため、別のポートを指定しておく
server.port=8085
logging.level.org.springframework.security=debug

# トークンイントロスペクションのエンドポイント
# [keycloakのホスト]/realms/[レルム名]/protocol/openid-connect/token/introspect
spring.security.oauth2.resourceserver.opaquetoken.introspection-uri=http://localhost:8081/realms/Hello_keycloak/protocol/openid-connect/token/introspect
# api-app ⇒ API用に作成したクライアントID
spring.security.oauth2.resourceserver.opaquetoken.client-id=api-app
# ze2RGT8tBy7AVUQStJbnOCPHkrzfjBGN ⇒ 先ほどコピーしておいた client secret
spring.security.oauth2.resourceserver.opaquetoken.client-secret=ze2RGT8tBy7AVUQStJbnOCPHkrzfjBGN
5-4.APIの実装
package com.example.demo.controller;

import org.springframework.web.bind.annotation.GetMapping;
import org.springframework.web.bind.annotation.RestController;

@RestController
public class APIController {

    @GetMapping("/data")
    public String getData() {
        return "API data";
    }

    @GetMapping("/data2")
    public String getData2() {
        return "API data2";
    }

    @GetMapping("/data3")
    public String getData3() {
        return "API data3";
    }
}
5-5.API呼び出しの実装
『OIDC認証実装』シートで作成したアプリケーションにログイン後にAPIを呼び出せるようにする。
:
@GetMapping("/call01")
public ResponseEntity<String> callExternalApi01(@RegisteredOAuth2AuthorizedClient("keycloak") OAuth2AuthorizedClient authorizedClient) {
	// 外部APIのエンドポイントURL
	String apiUrl = "http://localhost:8085/data";

	// RestTemplateを作成
	RestTemplate restTemplate = new RestTemplate();
	HttpHeaders headers = new HttpHeaders();
	// アクセストークンを設定
	headers.setBearerAuth(authorizedClient.getAccessToken().getTokenValue());
	HttpEntity<?> entity = new HttpEntity<>(headers);

	// 外部APIにGETリクエストを送信
	ResponseEntity<String> response = restTemplate.exchange(apiUrl, HttpMethod.GET, entity, String.class);

	// 外部APIからのレスポンスを返す
	return response;
}
@GetMapping("/call02")
public ResponseEntity<String> callExternalApi02(@RegisteredOAuth2AuthorizedClient("keycloak") OAuth2AuthorizedClient authorizedClient) {
	// 外部APIのエンドポイントURL
	String apiUrl = "http://localhost:8085/data2";

	// RestTemplateを作成
	RestTemplate restTemplate = new RestTemplate();

	HttpHeaders headers = new HttpHeaders();
	// アクセストークンを設定
	headers.setBearerAuth(authorizedClient.getAccessToken().getTokenValue());
	HttpEntity<?> entity = new HttpEntity<>(headers);

	// 外部APIにGETリクエストを送信
	ResponseEntity<String> response = restTemplate.exchange(apiUrl, HttpMethod.GET, entity, String.class);

	// 外部APIからのレスポンスを返す
	return response;
}
@GetMapping("/call03")
public ResponseEntity<String> callExternalApi03() {
	// 外部APIのエンドポイントURL
	String apiUrl = "http://localhost:8085/data3";

	// RestTemplateを作成
	// .permitAllのURIにはアクセストークン不要
	RestTemplate restTemplate = new RestTemplate();
	// GET リクエストを送信
	ResponseEntity<String> response = restTemplate.getForEntity(apiUrl, String.class);
	// 外部APIからのレスポンスを返す
	return response;
}
:| headers.setBearerAuth(authorizedClient.getAccessToken().getTokenValue()); | アクセストークンを設定 |
用意したコントローラメソッドを呼び出すためのボタンを用意する。
<!DOCTYPE html>
<html xmlns:th="http://www.thymeleaf.org">
<head>
	<script src="/js/index.js"></script>
</head>
<body>
	<div id="container">
		<h1>
			Hello, <span th:text="${username}"></span>
		</h1>
	</div>
	<div>
		<button id="callApiButton1">Call API01</button>
		<button id="callApiButton2">Call API02</button>
		<button id="callApiButton3">Call API03</button>
		<div id="response"></div>
	</div>
	<div>
		<a href="/logout">ログアウト</a>
	</div>
</body>
</html>
window.onload = function() {
document.getElementById("callApiButton1").addEventListener("click", function() {
fetch('/call01') // Java Controllerのエンドポイントにリクエストを送信
.then(response => response.text())
.then(data => {
document.getElementById("response").textContent = data; // レスポンスを表示
})
.catch(error => {
console.error("API call failed:", error);
});
});
document.getElementById("callApiButton2").addEventListener("click", function() {
fetch('/call02') // Java Controllerのエンドポイントにリクエストを送信
.then(response => response.text())
.then(data => {
document.getElementById("response").textContent = data; // レスポンスを表示
})
.catch(error => {
console.error("API call failed:", error);
});
});
document.getElementById("callApiButton3").addEventListener("click", function() {
fetch('/call03') // Java Controllerのエンドポイントにリクエストを送信
.then(response => response.text())
.then(data => {
document.getElementById("response").textContent = data; // レスポンスを表示
})
.catch(error => {
console.error("API call failed:", error);
});
});
}5-6.動作確認
※下記の番号はすべて「●OIDC認証フロー」に対応している。
呼び出し元のアプリケーションにログイン